Showing posts with label beads. Show all posts

Boho wrap bracelet with Steampunk style.

Silk wrap bracelet. Silk ribbons, pewter face, vintage watch parts, really old bronze escutcheon, bronze colored, winged bird in flight, oodles of beads, HUNDREDS! of hand stitches and Japanese glass beads. Will wrap about three times around your arm. Can be worn around your neck or on your ankle too.

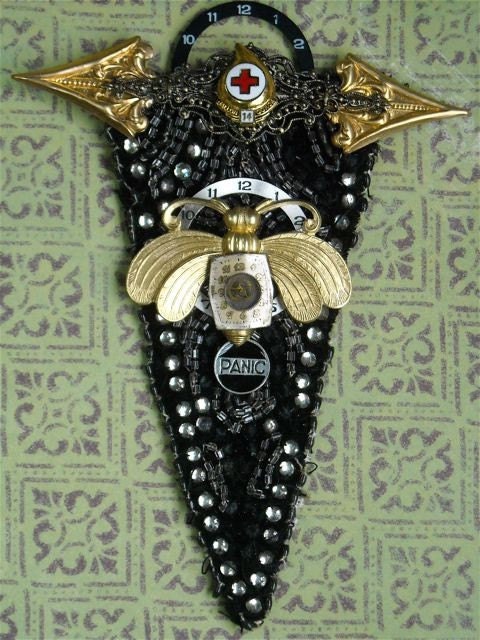
Badge of Honor


Leslie held her head while people ran in all directions. Dr. Vogel's experiment went wildly wrong, causing panic everywhere. She kept people streaming in the right direction, away from the smoke, staying until they all had cleared the building. Rushing back to the laboratory she pulled Dr. Vogel by his lapels down the hall and into the afternoon sun. Her bravery that day won her this badge.

Fairies Fly About in the Day


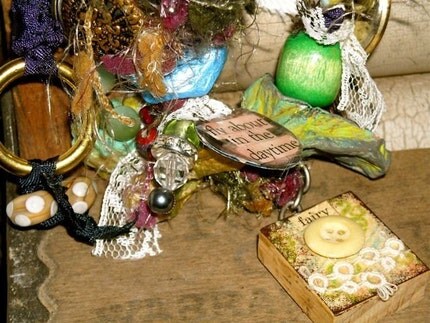
Fairies Fly About in the Day Mixed media necklace.  I used vintage seam bindings, antique lace and tatting, old bells, buttons and beads. A slice of wood with a collaged picture and a tag made with many layers of papers,ephemera, then sealed and tipped with gold paint. A pewter pendent with a Celtic symbol for protection is sewn into the mix. The closure is a giant vintage button with a loop to hold it securely. Glass beads are strung throughout the length.

Interesting note about the necklace: Farmgirlrocks, found on etsy, made some of beads, they look like giant turquoise nuggets. She used potatoes that she dehydrated, then sanded, painted and sealed. The funniest things I ever saw in a bead, BUT! they're fabulous. I love the colors and texture. They add such a new and different dimension to this piece. When I find interesting items
 to include in my jewelry it's like finding a treasure. Farmgirlrocks 


Three Weeks and Still Cleaning the Studio!


Week three and I’m still trying to organize my supplies and art rooms!  Imagine spending that much time on a project and still not having it finished!  Yesterday I had shelves put up in my sewing room.  I spent the evening folding fabric and stacking it by color on the shelves and into giant plastic bins.  There are probably about 40 bins around the house now.  You should buy stock in RubberMaid.   


So many tubes of seed beads,  not just in the sewing room, they’re in the kitchen, living room, art room, probably in the bathroom if you open a cabinet and look.  My husband has (had) a really great wood chest for tools that I “borrowed” for the organization of seed beads.  Each drawer can have it’s own color.  About half the drawers are full so far.   It’s hard to stay on task and finish a project, too many things to excite me.    A beautiful bead I had stashed out of site, silky, vintage, satin ribbons in a drawer or an article pulled from a magazine for later reference.  How can I not stop and look?  I’m thinking probably two more weeks before this job gets done.  I’m not giving up though.  I work on it a bit every day.  It’s even gotten to be a pleasure revisiting some forgotten treasures hidden away in my unorganized mess. 

Bar Mitzvah making a present: Mezuzah


When Ben was about 5 years old, I met him as a student, in one of my art classes.   Absolutely one of the cutest, smartest, funniest kids I've known.  He drew pictures, complete with stories,  that he would pull from his mind.  At dinner, my family had to listen to me tell about this wonderful, talented child I had the pleasure of being with.    His mother, who also is multi talented, funny and just fun to be with, and I have become friends.  I’ve been invited to Ben’s Bar Mitzvah this month.  I’m making him a Mezuzah.  The pictures are in progress, I haven't applied the gold and copper leaf.  His mother is getting the prayer to place inside. 


mezuzah |məˈzoŏzə| (also mezuza)

noun ( pl. mezuzahs or mezuzas or mezuzot or mezuzoth |məˈzoŏzōt|)

a parchment inscribed with religious texts and attached in a case to the doorpost of a Jewish house as a sign of faith.

ORIGIN mid 17th cent.: from Hebrew mĕzūzāh ‘doorpost.’

tutorial: How to make a rabbit pendant


Here are some quick instructions how to make a beautiful rabbit charm using a plastic toy.  Supplies needed:  plastic toy, silver metallic- enamel paint, oven, black acrylic paint, gloss or satin sealer.  A dremel or drill to put a hole through.  Before I start painting I put a hole with my dremel tool,  through the middle of the rabbit's back, all the way through and out the bottom, or his stomach.  Then I clean him to get all the drill dust off.  With a paint brush I put on two coats of enamel, follow directions on the bottle.  You can get enamel paint in the craft store with the other bottle of craft paint.  After I let it dry for about an hour I put it in my kitchen oven or craft dedicated toaster oven and bake it for the time on the enamel package.  I usually start checking it about half way through to see  if it is set and dry.  You don't want to walk away while you're doing this or your rabbit may melt.  When it's done, carefully remove it from the oven and allow it to cool.  If the legs are curled at all, now is the time to straighten them.  After it's completely cooled, put a coat of black acrylic paint on the entire rabbit, then wipe off with a clean, soft cloth.  This will make the rabbit look antiqued.  When this is dry, two to three coats of sealer may be applied.  Allow it to dry completely between coats.   When finished you can thread a wire or string through the hole and make it into a pendant.  I've used regular acrylic instead of the enamel and it will rub off with wear.  You want your piece to look professional so take the time to use the enamel.  If you are just doing this for an assemblage where it won't be getting any wear you could probably get away with just acrylic.  In jewelry you'll need to make it durable.  You don't have to use a rabbit, any hard plastic toy will work.  I use the ones made in Germany, they cost more but they are a much better toy, they are stronger, better made and have great detail. 

Snowing in Philadelphia Potato beads!


It's been snowing here all night. I was hoping to get snowed in, but no luck!!
Last night on my etsy supply site I listed some potato beads. A friend of mine, Sandy Dawson, makes them from real potatos. She dries them in a dehydrator and cuts, sands, paints and repaints, and seals them. Drilled for bead and what an outcome. The texture is bizarre. When you tell people they're potatoes they can't believe it. Here's a link to the potatoes: http://www.etsy.com/view_listing.php?listing_id=20607084 and here's a link to a necklace she made with them: http://www.etsy.com/view_listing.php?ref=sr_list_2&listing_id=11453239&ga_search_query=potato&ga_search_type=user_shop_

Mixed with glass beads they're fantastic, I love hard and soft, smooth and rough mixed together. I think her turquoise ones are the best. Have a look and let me know what you think of them.